
Container Gardens
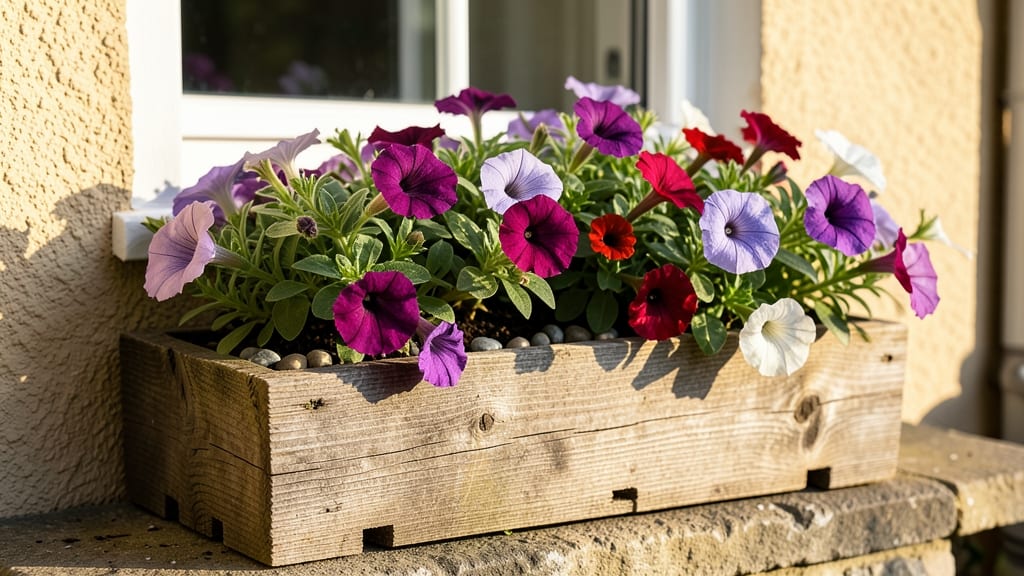
Window boxes burst with color right outside your kitchen or living room—potting window boxes turns any home into a year-round garden showpiece. 🌸 I’ve filled mine with trailing petunias, fragrant lavender, and herbs like thyme, creating a living border that smells as good as it looks.
The secret isn’t fancy containers—it’s the right mix of plants, soil, and a little design planning that makes them thrive without fuss.
Start with containers that have drainage holes (or drill them yourself)—no one wants soggy roots ruining the view. Use a lightweight potting mix designed for containers, and pair heavy feeders like petunias with drought-tolerant plants like sedum.
A 12-inch window box holds about 1 cubic foot of soil, so plan your plant spacing accordingly: bigger blooms need more room, while trailing plants should hang over the edges for that classic look.
By mixing textures and colors—think velvety ferns, spiky ornamental grasses, and cascading ivy—you’ll create a display that changes with the seasons. Spring brings tulips and pansies, summer bursts with geraniums, and fall offers ornamental kale or dusty miller.
Winter? Evergreens like boxwood or heather keep the show going. The best part? You can swap out plants in under an hour, keeping your boxes fresh all year.
Here’s the game-changer: watering twice daily in summer heat prevents wilting, and a slow-release fertilizer keeps blooms coming. If your boxes dry out fast, add a layer of mulch to lock in moisture.
And don’t forget—window boxes need at least 6 hours of sunlight to perform their best. With these basics, you’ll have a front-row seat to a garden that never stops impressing.
📚 In This Guide
- What you need
- Instructions
- Tips and common mistakes
- Wrapping up and next steps
What you need
- ● Window box (1-3 units): Choose from plastic, wood, or metal (12–24" long, 6–12" deep, and 6–8" tall). Ensure it has drainage holes!
- ● Potting soil (2–5 gallons): Use a lightweight, well-draining container mix (avoid garden soil—it compacts!).
- ○ Drainage material (optional but recommended): Small pebbles, perlite, or broken pottery (1–2 inches) to prevent root rot.
- ● Plants (3–5 per box): Select compact varieties like petunias, pansies, ferns, or succulents (check sunlight needs!).
- ● Watering can or spray bottle: A gentle spray helps avoid soil erosion.
- ● Gloves (1 pair): Protect your hands from soil and thorns.
- ● Trowel or small shovel: For planting and soil adjustments.
- ● Scissors or pruners: To trim plants and deadhead flowers.
- ○ Fertilizer (slow-release or liquid): Optional but great for long-term growth.
- ○ Mulch (optional): Shredded bark or stones to retain moisture and suppress weeds.
Step-by-Step instructions for potting window boxes
Here's how to create vibrant window boxes that bring life to any space—no green thumb required.
🪴 Step 1: Select and Prepare Your Window Box
Choose a box with drainage holes—critical for preventing root rot. I prefer lightweight plastic or wood with a depth of at least 6 inches to accommodate roots and soil. If your box is new, line the bottom with landscape fabric to keep soil from washing out while still allowing water drainage.
Place the box on a sturdy bracket or mount it directly to the wall. Make sure it's level—uneven boxes create water pooling and uneven plant growth. Use a level tool or eye it from the side to check. If you're working with a pre-mounted box, skip this step and move straight to soil prep.
🌱 Step 2: Layer Soil and Add Drainage Material
Fill the bottom 1-2 inches with gravel or coarse perlite—this creates a drainage layer that prevents soggy roots. Don't skip this step, even if your box has holes. I like to use pebbles for a decorative touch while still serving the functional purpose.
Next, add 2-3 inches of high-quality potting mix. Avoid garden soil—it compacts and drains poorly in containers. Fluff the soil with your hands to remove air pockets, then press down gently so it's firm but not packed. You want roots to have room to spread without floating in loose soil.
☀️ Step 3: Plant Your Color Combination
For a 4-foot window box, I recommend 3-5 plants total—this creates a lush look without overcrowding. Start with thrillers (tall plants like snapdragons or salvia) at the back, fillers (medium-height plants like petunias or lobelia) in the middle, and spillers (trailing plants like sweet potato vine or fuchsia) at the edges.
Dig holes slightly deeper than the root ball and place each plant gently. Firm the soil around the base to eliminate air gaps. Water immediately after planting to settle the soil and remove any air pockets. Avoid overwatering—just enough to moisten the soil without creating runoff.
💧 Step 4: Water and Maintain for Year-Round Color
Water deeply every 2-3 days until the top 1 inch of soil feels dry. In hot weather, you may need to water daily—check the soil with your finger. Morning watering prevents evaporation and fungal issues. I like to use a gentle spray nozzle to avoid disturbing the plants.
Fertilize every 4-6 weeks with a balanced liquid fertilizer (10-10-10 or similar). Over-fertilizing burns roots, so always dilute to half-strength. Deadhead spent blooms regularly to encourage continuous flowering. In fall, replace tender annuals with cold-hardy plants like pansies or dusty miller for winter interest.
✂️ Step 5: Prune and Refresh Seasonally
Every 2-3 months, trim back leggy growth to encourage bushier plants. Use clean, sharp scissors to snip just above a leaf node. This keeps your window box looking full and vibrant. I also rotate the box a quarter turn monthly so plants grow evenly toward the light.
By late summer, your window box may look tired. Refresh it by removing one-third of the oldest plants and replacing them with new ones. This rejuvenates the display and prevents disease buildup. With this care routine, your window box will stay colorful and healthy all year long.
Tips & tricks for perfect window box planting
Creating stunning window boxes is all about the details—here's how to avoid common pitfalls and elevate your design.
Drainage is Non-Negotiable: The 1-2 inches of gravel or pebbles in Step 2 isn't just about drainage—it's your first line of defense against root rot. I've seen window boxes fail spectacularly when this step gets skipped, especially in rainy seasons. Pro tip: Add a layer of mesh hardware cloth between your drainage layer and soil to prevent fine soil particles from clogging the holes over time. This simple addition can extend the life of your window box by years.
Soil Science Matters: When adding that 2-3 inches of potting mix in Step 2, don't just scoop from the bag—break up any clumps first. I like to mix in a handful of perlite or vermiculite to improve aeration. This creates tiny air pockets that roots love, preventing that compacted, waterlogged feeling. Also, consider adding a slow-release fertilizer to your soil mix right at planting time—it'll feed your plants for months without the hassle of frequent watering.
Plant Placement Strategy: For that perfect 4-foot window box arrangement in Step 3, think of it like a painting—your thrillers are the background, fillers are the midground, and spillers are your foreground. I always plant my tallest plants first, then work forward. This prevents you from accidentally burying smaller plants under taller ones. Another trick: Space your plants slightly closer than you think you need to—they'll fill out beautifully over time, creating that lush, full look without looking crowded.
Watering Wisdom: That "every 2-3 days" guideline in Step 4 is perfect, but here's the secret: Water in the morning and use the "finger test" method. Stick your finger about 1 inch into the soil—if it feels dry, it's time. I've learned this the hard way after watching plants wilt from both underwatering and overwatering. For extra insurance, consider adding a moisture meter to your gardening toolkit—it takes the guesswork out of watering and prevents root stress.
Pro Tips for Potting Window Boxes
- Creating stunning window boxes is all about the details—here's how to avoid common pitfalls and elevate your design.
- Drainage is Non-Negotiable: The 1-2 inches of gravel or pebbles in Step 2 isn't just about drainage—it's your first l...
- Soil Science Matters: When adding that 2-3 inches of potting mix in Step 2, don't just scoop from the bag—break up an...
Frequently asked questions
Got questions about potting window boxes? You’re not alone! Here are some of the most common concerns—and their easy solutions—to help you create stunning, low-maintenance displays all year round.
What’s the best soil mix for window box plants?
Use a lightweight, well-draining potting mix blended with perlite or sand (about 20% by volume) to prevent root rot. For herbs and succulents, add extra perlite or coarse sand. Avoid garden soil—it compacts and suffocates roots in tight containers!
How often should I water window box plants?
Window boxes dry out fast—check soil moisture daily in summer and every 2–3 days in cooler months. Water deeply until it drains from the bottom, but avoid soggy soil. Pro tip: Group plants with similar water needs together to simplify care.
Can I reuse old window box soil?
Yes, but refresh it first! Remove dead plants, break up clumps, and mix in 25–30% fresh potting soil or compost. If pests or diseases appear, sterilize the soil with heat (like baking at 200°F for 30 minutes) or replace it entirely.
What are the easiest plants for beginners in window boxes?
Start with hardy, compact varieties like petunias, pansies, sedum, or thyme. For year-round color, mix evergreens (e.g., helichrysum) with seasonal bloomers. Avoid fast-growing vines—they’ll spill over and block light.
Why are my window box plants wilting or turning yellow?
Yellow leaves often mean overwatering or poor drainage, while wilting signals underwatering or root stress. Check drainage holes, adjust watering, and ensure pots aren’t too deep for the plant’s roots. Quick fix: Trim damaged leaves to encourage new growth.
How do I keep pests out of my window boxes?
Prevent pests with neem oil sprays or companion planting (e.g., marigolds repel aphids). Remove debris regularly, and avoid overcrowding. If bugs strike, isolate affected plants and treat with insecticidal soap.
Wrapping up and next steps
Potting window boxes is a rewarding way to bring life, color, and charm to any space—no matter the season! With the right materials, a little creativity, and a touch of care, you can transform even the smallest balcony or windowsill into a thriving garden.
Whether you’re a seasoned gardener or just starting out, every window box is a blank canvas waiting for your touch.
Now that you’re armed with tips and answers, roll up your sleeves and get planting! 🌱 Start small with a single box, experiment with textures and colors, and watch your outdoor space bloom with personality.
Ready to take the next step? Browse our favorite window box plants or share your progress with the gardening community—your green thumb is about to shine!