Container Gardens
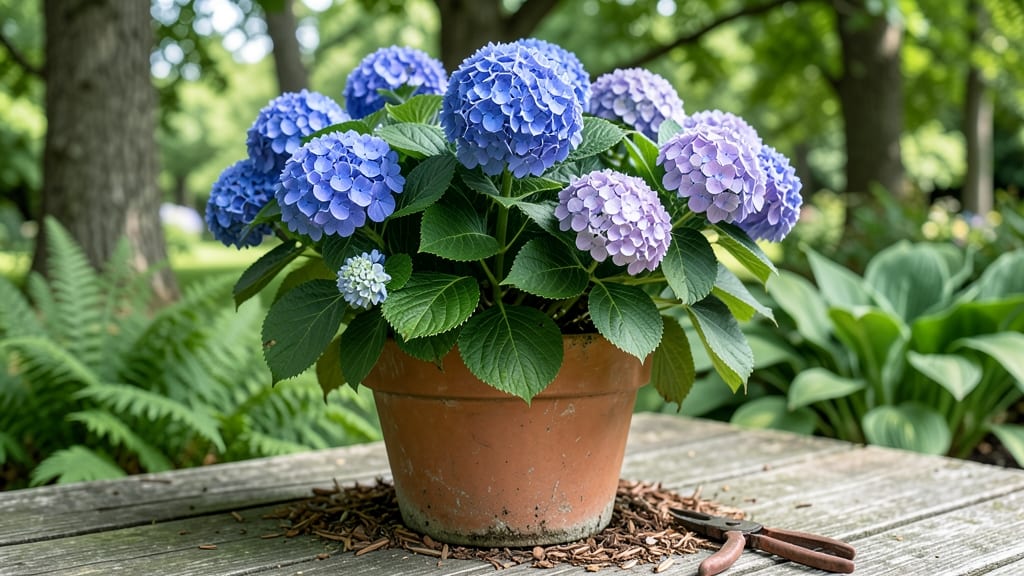
Your small potted hydrangea can bloom all year if you nail the container setup and care routine. ✨ I’ve turned my balcony into a nonstop floral display by mastering the balance of sunlight, soil moisture, and pruning timing—no greenhouse needed.
The secret isn’t fancy equipment but well-draining soil (equal parts potting mix and perlite) and a container with drainage holes. Hydrangeas in pots dry out faster than in-ground plants, so I water twice weekly in summer and adjust for rain.
A morning sun, afternoon shade spot keeps the blooms vibrant without scorching the leaves. By winter, your plant will reward you with compact, lush clusters that last months longer than garden-center hydrangeas.
The key is winter prep: move pots to a sheltered spot and reduce watering to keep roots from rotting in cold, wet soil. Works for patios, decks, or sunny windowsills—just adjust the container size (18-24 inches for mature plants) and you’ll have year-round color without the yard space.
Let’s get those blooms going!
📚 In This Guide
- What you need
- Instructions
- Tips and common mistakes
- Wrapping up and next steps
What you need
- ● Small potted hydrangea: Choose a variety like 'Mini Penny', 'Endless Summer' (compact), or 'Little Lime'. Ensure the pot is 10–14 inches in diameter with drainage holes.
- ● High-quality potting mix: 1–2 gallons of well-draining, peat-based or coco coir blend (e.g., Miracle-Gro Potting Mix or FoxFarm Ocean Forest). Avoid garden soil!
- ● Slow-release fertilizer: 1–2 tbsp of Osmocote Smart-Release Plant Food (14-14-14 NPK) or a hydrangea-specific formula.
- ● Watering can with a rose attachment: 1–2 gallons capacity for gentle, deep watering.
- ● Pruning shears: Sharp, clean pair (e.g., Fiskars Bypass Pruners) for shaping and maintenance.
- ○ Mulch (optional but recommended): 1–2 inches of pine bark fines or coconut coir to retain moisture.
- ● Gloves: Lightweight gardening gloves to protect your hands from thorns or soil.
- ● pH testing kit: For hydrangeas that love blue (acidic, pH 5.0–5.5) or pink (neutral, pH 6.0–7.0) blooms.
- ● Spray bottle: For misting leaves if humidity drops below 50%.
- ○ Decorative accents: Optional! Add pebbles, moss, or a small figurine for a cottage-core touch.
Step-by-Step instructions for growing small potted hydrangeas
Transform your patio into a blooming paradise with these compact, vibrant hydrangeas that thrive in containers.
🪴 Step 1: Select the Right Container and Drainage
Choose a container with a diameter of at least 12 inches—hydrangeas need room for their sprawling roots. I prefer glazed ceramic or lightweight plastic because they retain moisture while preventing root rot. Make sure the pot has multiple drainage holes at the bottom; if it doesn’t, drill 2-3 additional holes yourself. Without proper drainage, hydrangeas develop root rot within 2-3 weeks of overwatering.
Place a 2-inch layer of gravel or broken pottery in the bottom of the pot before adding soil. This creates an air gap that prevents water from pooling at the roots. If you’re using a decorative cache pot (one that sits inside a larger outer pot), ensure the inner pot has drainage too—water trapped between containers will suffocate the roots.
🌱 Step 2: Prepare the Soil Mix for Optimal Growth
Hydrangeas love moist, slightly acidic soil with a pH between 5.2 and 6.0—this is key for those signature blue or pink blooms. Mix 3 parts high-quality potting soil with 1 part peat moss or coconut coir and 1 part perlite or coarse sand to improve drainage. I add a handful of slow-release fertilizer (like 10-10-10) to the mix for a nutrient boost without risking burn.
Fill the container 2/3 full with your soil mix, leaving room for the hydrangea’s root ball. Tap the pot gently on the table to settle the soil, but don’t compact it—hydrangeas need well-aerated roots. If you’re repotting an existing hydrangea, loosen the roots slightly with your fingers before placing it in the new container to encourage outward growth.
☀️ Step 3: Plant and Position for Light and Blooms
Remove the hydrangea from its nursery pot and gently tease the roots apart if they’re circling. Place the plant in the center of the container so the top of the root ball sits 1 inch below the rim—this prevents soil from spilling out when you water. Backfill with your soil mix, pressing lightly around the edges to eliminate air pockets. Water deeply until the soil is evenly moist but not soggy.
Hydrangeas need morning sun and afternoon shade in hot climates to prevent leaf scorch. In cooler regions, they tolerate full sun (6+ hours daily). If your patio gets intense afternoon sun, move the pot to a spot with dappled shade after 10 AM. You’ll know the light is right when the leaves stay deep green and the stems don’t look stretched or leggy.
💧 Step 4: Water and Feed for Vibrant Blooms
Water your potted hydrangea when the top 1-2 inches of soil feel dry to the touch. I use a self-watering glob to deliver moisture directly to the roots, which reduces evaporation and keeps the soil consistently moist—hydrangeas hate drying out. In summer, you might water every 2-3 days, but adjust based on your climate. Overwatering is worse than underwatering; yellowing leaves or mushy stems signal you’re drowning the roots.
Feed your hydrangea every 4-6 weeks during the growing season (spring to fall) with a balanced liquid fertilizer (like 20-20-20) diluted to half strength. For blue blooms, add aluminum sulfate to the soil in early spring (follow package instructions). For pink blooms, avoid aluminum and maintain a pH of 6.0 or higher. You’ll see the color shift within 4-6 weeks of consistent care.
✂️ Step 5: Prune and Maintain for Year-Round Health
Prune your hydrangea right after flowering in late summer or early fall. Remove dead or damaged stems at the base, and cut back overly long branches to encourage bushier growth. For mophead hydrangeas, trim stems back to 4-6 inches from the base—this stimulates new blooms for next season. Avoid heavy pruning in spring, as it removes next year’s flower buds.
In winter, move the pot to a protected location (like a garage or under an eave) if temperatures drop below 20°F. Hydrangeas are hardy, but young plants or extreme cold can damage the foliage. If you notice brown, crispy leaves, it’s a sign of frost damage—simply trim them off in early spring, and new growth will emerge within 2-3 weeks. Mulch the soil surface with 1-2 inches of shredded bark to insulate the roots.
Tips & tricks for perfect small potted hydrangeas
Here's what nobody tells you about keeping your compact hydrangeas thriving—and why the details matter more than you think.
Drainage is Non-Negotiable: That 2-inch gravel layer in Step 1 isn't just about aesthetics—it's your first line of defense against root rot. I've seen hydrangeas go from lush to limp in just 10 days when drainage fails. For extra insurance, add a layer of horticultural charcoal above the gravel to absorb excess salts from tap water. This works especially well if you're using a decorative cache pot system where drainage can get overlooked.
Soil pH is Your Color Palette: The 5.2-6.0 pH range in Step 2 isn't arbitrary—it's the sweet spot for aluminum uptake, which directly affects bloom color. Test your soil annually with a simple pH kit (they're just $5 at garden centers). For blue blooms, aim for 5.2-5.5; for pink, 6.0+. I keep a small bottle of citric acid handy to lower pH by 0.5 points when needed—just mix 1 teaspoon per gallon of water and apply to the soil surface.
Light Positioning is a Daily Decision: The morning sun/afternoon shade rule in Step 3 requires flexibility. If your patio gets intense afternoon sun, move the pot by 10 AM sharp—even 30 minutes of direct afternoon sun can scorch leaves. I use a simple trick: place a white plastic plate near the pot at noon. If it's hot to the touch, your hydrangea needs shade. For cooler climates, you can extend sun exposure to full sun, but monitor for leaf curl as a warning sign.
Winter Protection Goes Beyond Temperature: The 20°F threshold in Step 5 is just the starting point. For young plants or first-year growth, I recommend moving pots to protected locations at 32°F—cold damage starts at this temperature. Wrap the pot in bubble wrap (yes, the kitchen kind works) and cover the top with a frost blanket. This creates a microclimate that can raise temperatures by 5-10°F, making all the difference in marginal climates.
Pro Tips for Small Potted Hydrangea
- Here's what nobody tells you about keeping your compact hydrangeas thriving—and why the details matter more than you ...
- Drainage is Non-Negotiable: That 2-inch gravel layer in Step 1 isn't just about aesthetics—it's your first line of de...
- Soil pH is Your Color Palette: The 5.2-6.0 pH range in Step 2 isn't arbitrary—it's the sweet spot for aluminum uptake...
Frequently asked questions
Got questions about keeping your small potted hydrangea thriving? You’re not alone! Here are answers to the most common queries—from care tips to troubleshooting—to help your compact blooms shine all year.
How often should I water my small potted hydrangea?
Water when the top 1–2 inches of soil feel dry. Potted hydrangeas dry out faster than in-ground plants—aim for 1–2 times per week (more in heat or wind). Check soil moisture with your finger, and ensure pots have drainage holes to prevent root rot. Pro tip: Use room-temperature water to avoid shocking roots!
When is the best time to prune my small potted hydrangea?
Prune right after flowering (late summer/early fall) for mophead or lacecap varieties. For panicle hydrangeas, prune in late winter/early spring. Avoid heavy pruning in fall—it can reduce next year’s blooms. Use clean, sharp shears and cut back 1/3 of the oldest stems to encourage new growth.
Why are my hydrangea leaves turning yellow?
Yellow leaves usually signal overwatering or nutrient deficiency. Check soil moisture first—let it dry slightly between waterings. If leaves are pale, feed with a balanced fertilizer (10-10-10) in spring. Yellowing with brown edges? It could be salt buildup from tap water—flush the pot with distilled or rainwater.
Can I keep my small potted hydrangea indoors year-round?
Yes, but they thrive best in bright, indirect light (like near a window). Avoid drafts or heating vents, which dry out soil. If indoors, rotate the pot weekly for even growth. In winter, reduce watering slightly—hydrangeas rest in cooler months. For extra blooms, move them outside in spring/summer!
What’s the easiest alternative to small potted hydrangeas?
Try dwarf impatiens (colorful, low-maintenance) or miniature roses (fragrant, repeat-blooming). For bold foliage, heuchera (corpse flower) or coleus are great choices. All three love similar conditions: partial shade, consistent moisture, and well-draining soil.
Wrapping up and next steps
Growing small potted hydrangeas is a rewarding way to bring vibrant color and lush beauty to any space—whether you're a seasoned gardener or just starting out! 🌸 With the right container, soil, and care, these compact plants thrive year-round, offering blooms that brighten up patios, balconies, or even windowsills.
The key is consistency: keep them hydrated, prune thoughtfully, and protect them from harsh weather.
Now that you’re armed with tips and tricks, why not take the next step? Grab a pot, pick your favorite hydrangea variety, and start your own mini garden today! Your future blooms will thank you—and so will your green thumb. 🌿